

Objective: achieve a reverse reverb effect using only MIDI and Free Software audio plugins. What we’re aiming for is the same piano effect that’s used on “Planisphere” by Justice (one of my favourite tracks).
Approach: I’ll use Qtractor Digital Audio Workstation (DAW), with a piano MIDI instrument, and the Impulse Response (IR) LV2 plugin. You could use any other DAW that supports LV2 plugins, e.g. Ardour.
Method:
- Make sure you’re using a GNU/Linux distribution that is configured to run with a real-time kernel, and has the JACK audio server set up and working.
- Open Qtractor, and create a new track, and set it up as your favourite MIDI piano instrument. In my case I used Calf Fluidsynth (available in many distribution repositories as part of the calf-plugins pack), loaded with a grand piano soundfont.
- Create a new clip and edit it with the “piano roll” (MIDI) editor to add some notes. Play the clip and make sure you can hear the sound. Here’s the clip that I used.
- Make sure you have the IR.LV2 plugin installed. This will handle the work of applying the reverse reverb effect. If it isn’t in your distribution’s software repositories, it can be easily compiled. Just download the source code, extract it, cd into its directory and run make, then make install. You’ll also need to install zita-convolver before compiling.
- In Qtractor, add IR as a secondary plugin to your piano instrument. IR should appear listed below the existing instrument plugin in the mixer window with a green light next to it showing that it’s enabled. If the IR plugin gui hasn’t appeared automatically, open it by double clicking on the IR plugin listed under the piano MIDI instrument in the mixer window.
- To make IR apply a reverb effect, we need an impulse response file to tell it what reverb pattern to use. I recommend the True M7 Impulse Pack, which contains a variety of high-quality WAV samples. Once downloaded and extracted, load a sample into IR by clicking “Open File” on the GUI. I’m using a room sample called “Blue Room L”. Here’s how my clip sounds with reverb applied.
- By this stage, a reverb effect should have been applied to your piano, and if you play it you should hear the difference. To get reverse reverb, we have to do some configuration however. Try setting the following:
Predelay = 0
Attack, Envelope, Length, Strech = 100%
Stereo In = 150%
Reverse = on (toggled)
Dry = Mute
Wet = -6dB
You can save this preset by clicking “Add” under “Bookmarks”. Choose somewhere sensible for the file and give it a name.By this stage you should see that the wave form in the graph preview window has changed, and that it illustrates a build up in volume representing the reverse reverb. Play your clip again – you should hear the desired effect! - You’ve now achieved the desired sound effect, but one problem remains – there’s now an audio delay between then the MIDI note should be played according to the tract, and when you hear the sound through speakers. This will obviously cause havok with the timing of your track and the other instruments that don’t have any delay in playback. There may be a more elegant solution to this problem, but here’s a workaround that works for me. Simply shift your piano clip(s) two beats (half a bar) earlier (to the left). With the IR settings above, this should correctly compensate for the delay. Now if you add other tracks, they should sound syncronised with your reverse reverbed track.
- That’s it, good luck!
Audio: piano-clip-no-reverb
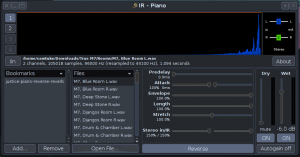
IR.LV2 Plugin configured for reverse reverb
Audio: piano-clip-reverb
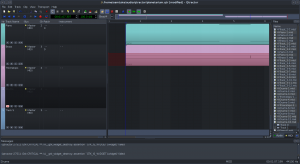
See how clips in both tracks are offset by two beats
So, what do you think ?